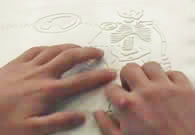
Creating Audio Tactile Graphics on The Fly with Livescribe Pen or PenFriend
Tools needed:
- PC or Mac
- Drawing Tool such as Adobe Illustrator, Corel Draw
- If you can hand draw neatly, that’ll work too
- Also can use a Xerox machine to manipulate your image into a clean printout, as long as the lines are simple, clear lines
- Pen Friend, with Stickers
- The PenFriend is originally from England’s RNIB
- Can get the PenFriend from a variety of online sites. Do not order from Maxi-Aids – unreliable. Independent Living Aids is good but they don’t seem to always have the product in stock. NFB’s site is good. https://ecommerce.nfb.org/asp/default.asp
- Be sure to also also extra sticker packs because what’s included with the PenFriend is just a few sheets.
- Sticker packs come in A, B, C, D, E, and F packs. You can use only these packs with each pen – once you use up all the labels for one pen, you’ll have to displace audio.
- You’ll need to keep track of the packs for each Pen you use (keep the stickers you buy as dedicated for each pen)
- As of this writing (Nov 14, 2015), two models of Pen Friend are available. The second model, PenFriend2, apparently comes only with three packs for 48 labels each
- Livescribe Pen, with SoundStickers
- Available at the Livescribe store online or amazon
- Swell Form Machine (ATC) or PIAF
- Capsule paper
- Optionally, 3D Doodler Pen and printing your own livescribe paper
Workflow For Stickers + Pen
- Create your image (following graphic guidelines) in AI or Corel, etc
- http://diagramcenter.org/table-of-contents-2.html
- Plan your image around the necessary labels. Leave enough room for the ¾ inch wide labels from Livescribe SoundStickers, or for the ¼ in wide stickers from PenFriend. Your stickers are different sizes, so plan accordingly!
- Plan to label consistently with respect to the item you are labeling, ie, always place sticker to the south/bottom of the item being marked.
- Print your image and swell it
- Apply stickers to where you need labels
- Don’t forget your “Landing Pad” sticker: a large sticker in the upper left corner of your paper for:
- Title of graphic
- Location of graphic (professor powerpoint or textbook)
- Descriptive overview of what the diagram is about
- Any “transcriber’s notes” (i.e., producer notes) that you want your user to be aware of – such as weird labeling situations or weird raised lines that may be confusing
- Record audio
- Some audio description may be long, such as for the “Landing Pad” – so you may want to write this out and then record
Workflow For Livescribe Paper + Livescribe Paper + 3D Doodler
- Print image on LiveScribe Paper with ink printer
- Trace over lines to be textured with 3Doodler
- Use Livescribe Pen to record audio in the desired areas
- Suggest following the Recording Tips below.
Swell Form Printing Tips
- After you print one image, remove the swell paper from the printer tray, lay it face up and let it dry a bit before swelling it. This will ensure a smoother swell
- Do not stack your printouts in the paper tray. As each one comes out, remove it and lay it face up
Audio Recording Tips
- For both PenFriend and Livescribe, allow enough time before speaking and after speaking to ensure your audio doesn’t cut off (play it back and test!)
- For Livescribe paper, if you want an area (rather than one fine point) to be active, follow the steps below. If you are using a Soundsticker, tapping once on the sticker will activate the entire surface area of that sticker.
-
- Hit record button on livescribe notebook paper
- Hit pause immediately in a 1-2 sequence
- Scribble in an area – like you are coloring it in. Doesn’t have to be perfect but get overlapping lines.
- Hit record button
- Put pen near mouth and speak label or whatever content
- Hit the stop button on the livescribe notebook paper.
- (Thanks to Josh Miele for figuring that out, and to Steve Landaue for sharing)
User Training Tips
- Teach your user to hit the “Landing Pad” sticker in the upper left corner of each page
- Teach your user to use a two-handed approach to the graphic; one hand to “anchor” their tactile perception of where the sticker label is, and the other to tap with the Pen.

